Manual ADR Cue Import from a Shooting Script
Overview
Production Shooting Scripts are created for the filming process & are sometimes maintained / updated by the Production during the Post Production process.
They are mostly presented as PDF files, and although their formatting is often simliar, depending on the Software used to create the script files - not always identical either.
 {width=70%}
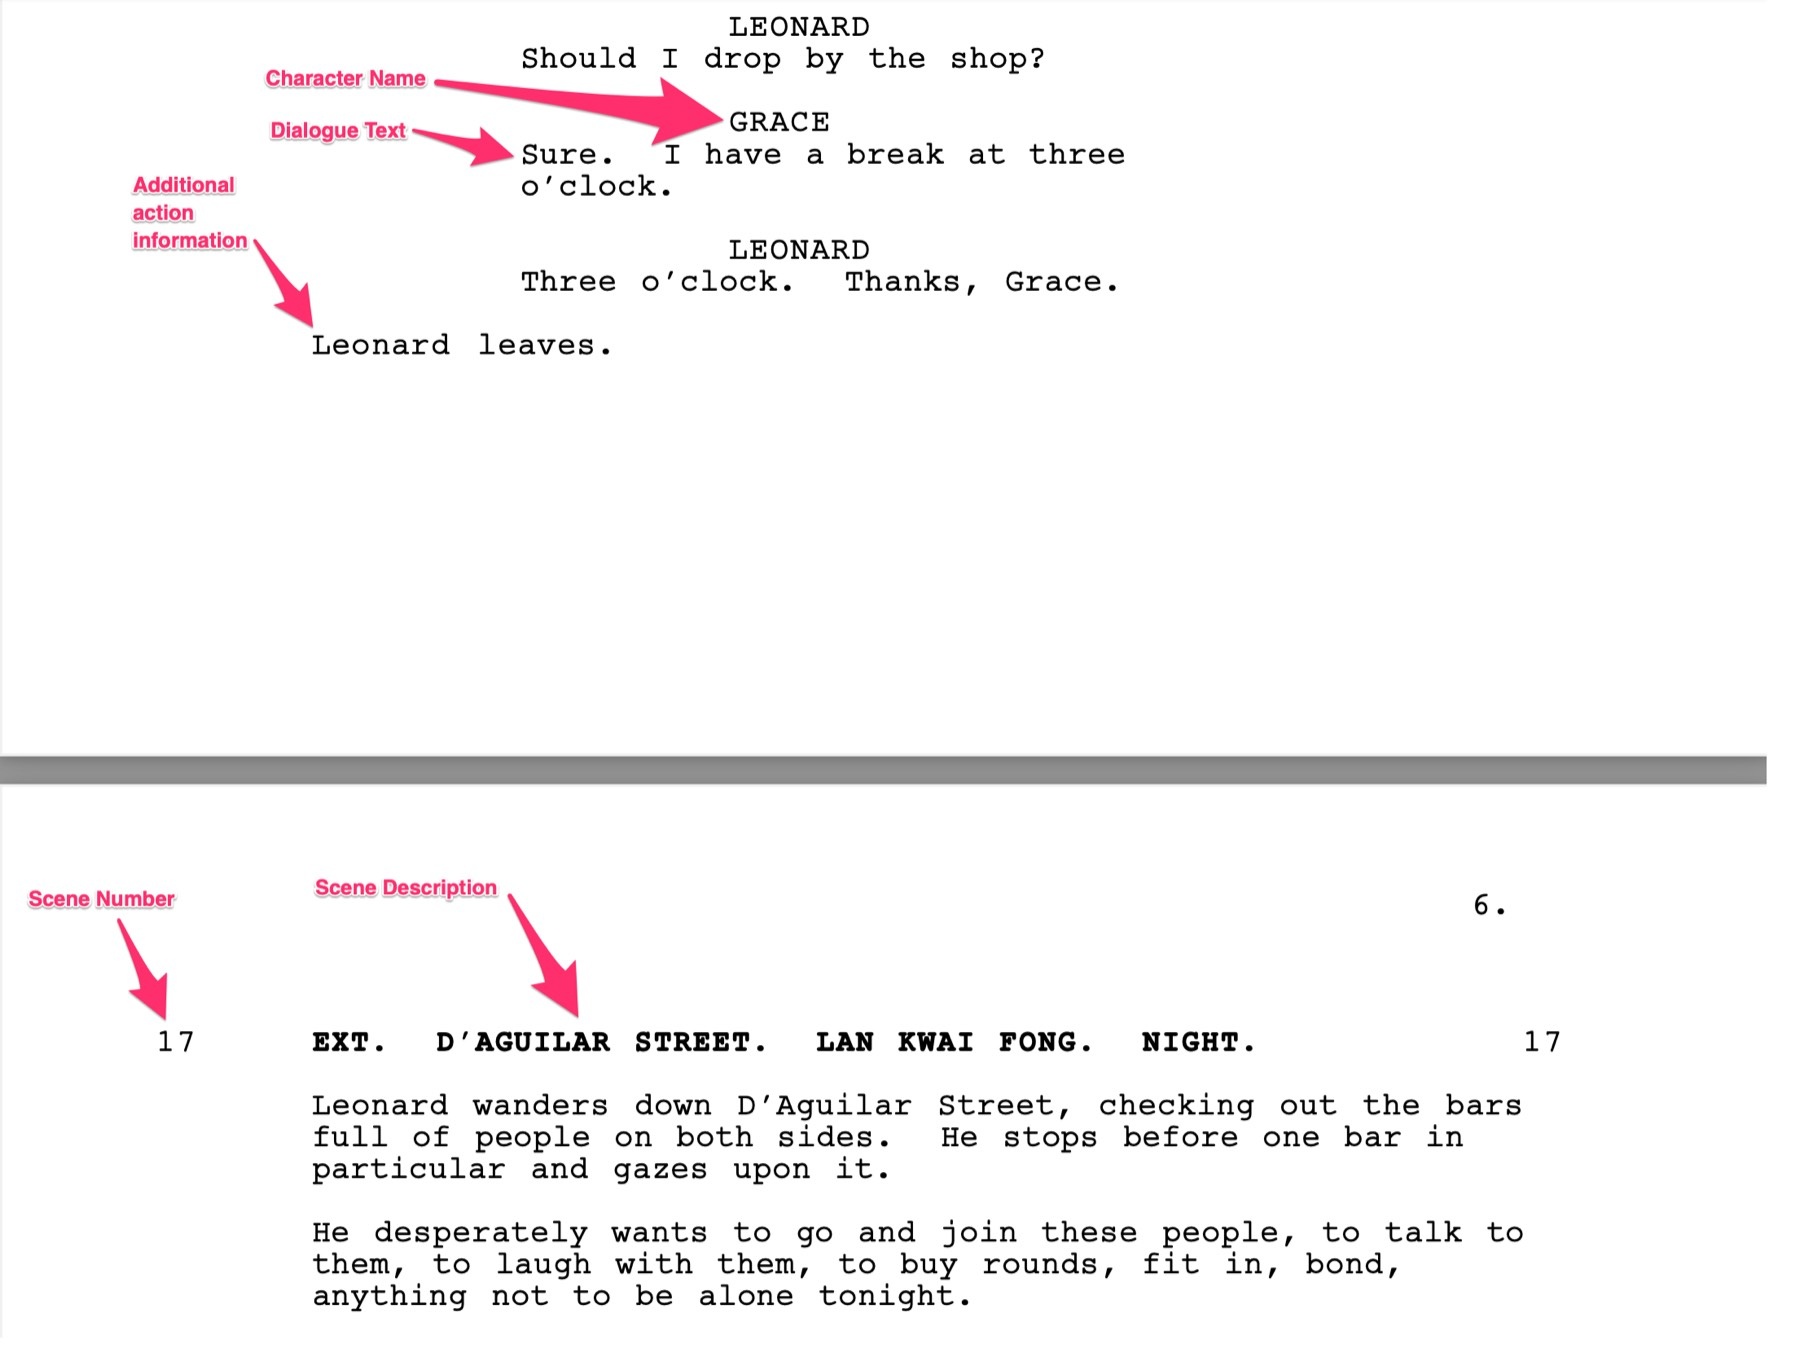
They are usually in time order, & contain the dialogue spoken by each character. They also contain other information like scene numbers, scene descriptions, & supplemetary detail like action, music playing or visual effects. Though for obvious reasons, they do not contain any timecode information.
This can be a very useful aid in capturing the lines to be recorded during the ADR logging process.
ADR Cue Numbering Scheme
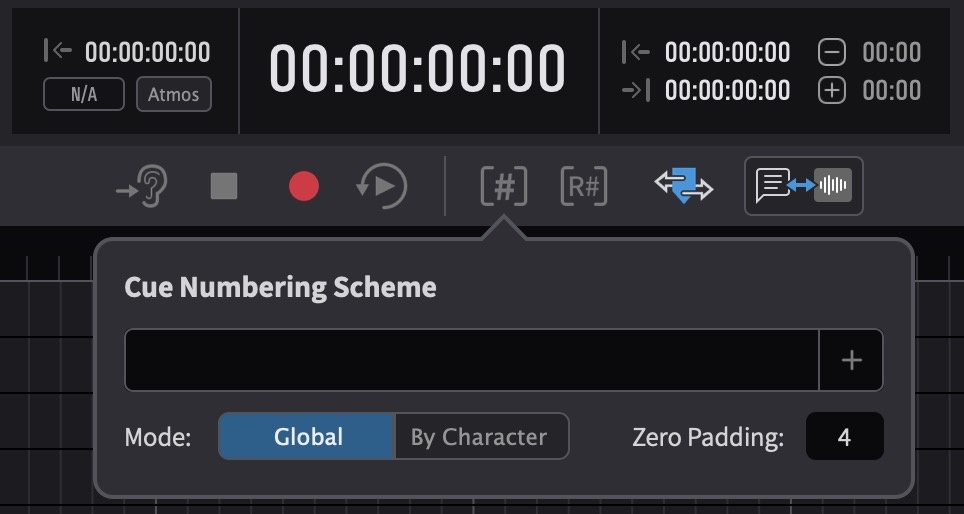
Before import, the chosen ADR Cue numbering scheme for imported cues should first be set in the PROJECT tab in the top left of the Cue Pro window.
 {width=70%}
Click the + on the right of the Cue Numbering Scheme field. There are 4 fields to chose from:
- Char Name
- Char Pfx
- Pic Version
- Ep/Reel
Once the desired fields are added, they appear as boxes in the field box to the left. Their order can be shuffled by clicking a box and moving it to the desired point in the cue name. Additionally, fixed text can be added between, before, or after them, which will be used as part of the cue name.
To choose whether cues are named Globally or By Character, use the Mode selector.
Use the text box to the right of Zero Padding to select the number of digits in the cue number. This is done by adding zeroes to the start of the cue number so that all cue numbers are the same length, e.g. 0001, 0164, 1265, etc. With a zero padding of 3 ADR will add leading zeros to all numbers so they are all 3 digits long (e.g. 001).
Setting the Timeline frame rate
It is vital that the frame rate of the Timeline is set correctly before importing cues. Failure to do so, will cause discrepancies in the duration & location of the cues - especially when the correct frame-rate video is eventually added to the Timeline. Setting the frame rate is done either automatically by simply adding video to the current Timeline; or if no video is present, by clicking the pencil icon to the top right of the active Timeline & in the Edit Timeline Settings window that appears, selecting the relevant frame rate from the TC Frame Rate pulldown menu.
Import
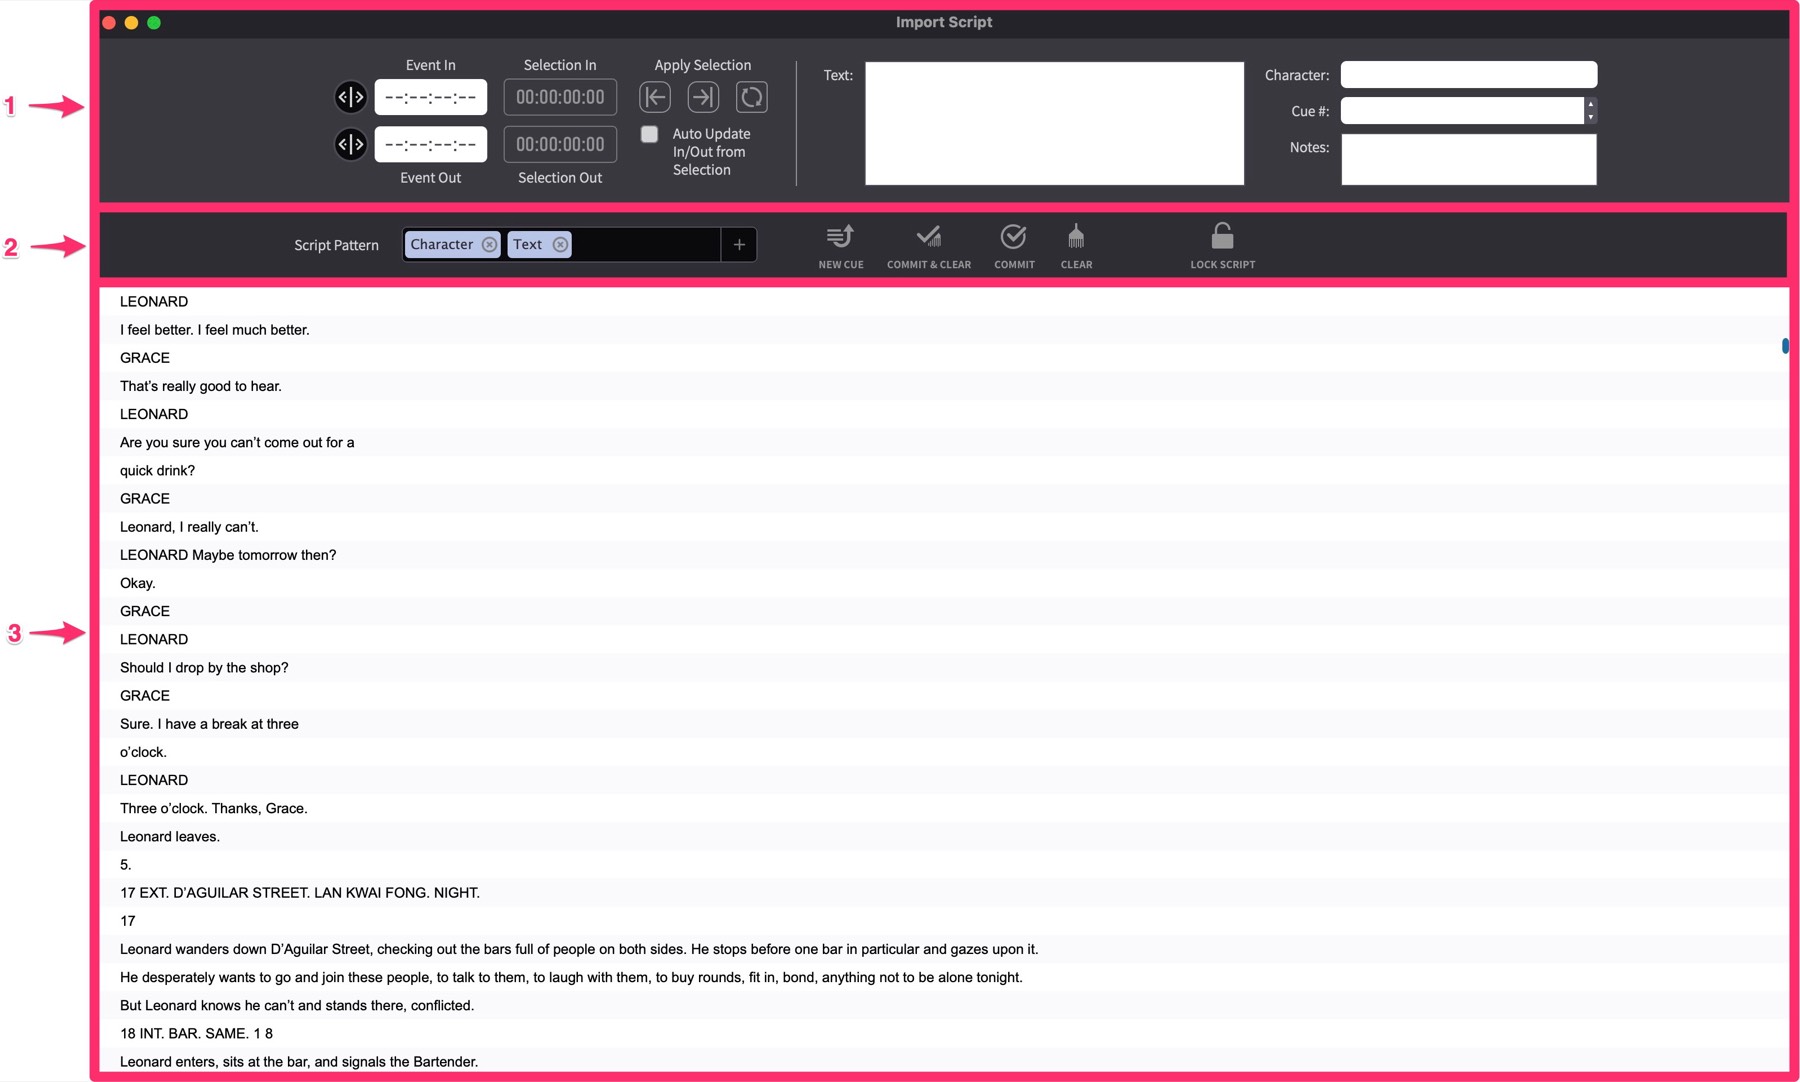
To import a Shooting Script, select File → Import Events from File and choose a file from the browser window & click Open. The Import Script window will appear.
 {width=85%}
It is also possible to show this window by clicking Import Events As Script from the Import Visual Events from File window at the end of any file format import process.
The window is split into three sections:
The top section (1) contains information about the current cue. Here all the information pertaining to a cue is added - prior to being committed to the Event List.
The middle section (2) contains a text field to define the script pattern as well as a number of buttons used to commit the cue to the actual event list. If more space is required in the Text & Note fields, click & drag the dividing boundary between section 2 and 3 of the Script Import Window down & up to resize.
At the bottom of the window (3), the script is displayed in a line-wise manner.
After selecting a script to be imported, Cue Pro will open the window shown above and it will display the script content in the bottom section of the window. As scripts are not always created according to common standards, Cue Pro will try to present the content in the most logical way, but the outcome may not always be as expected.
Editing the Script
To delete unuseful lines from the script, click on the lines & hit the delete button.
To edit lines in the script, double-click a line to enter edit mode, place the cursor & start editing. Hit the Return key once done.
Click the Lock Script icon to prevent any items in the list from being inadvertantly edited or deleted.
 {width=90%}
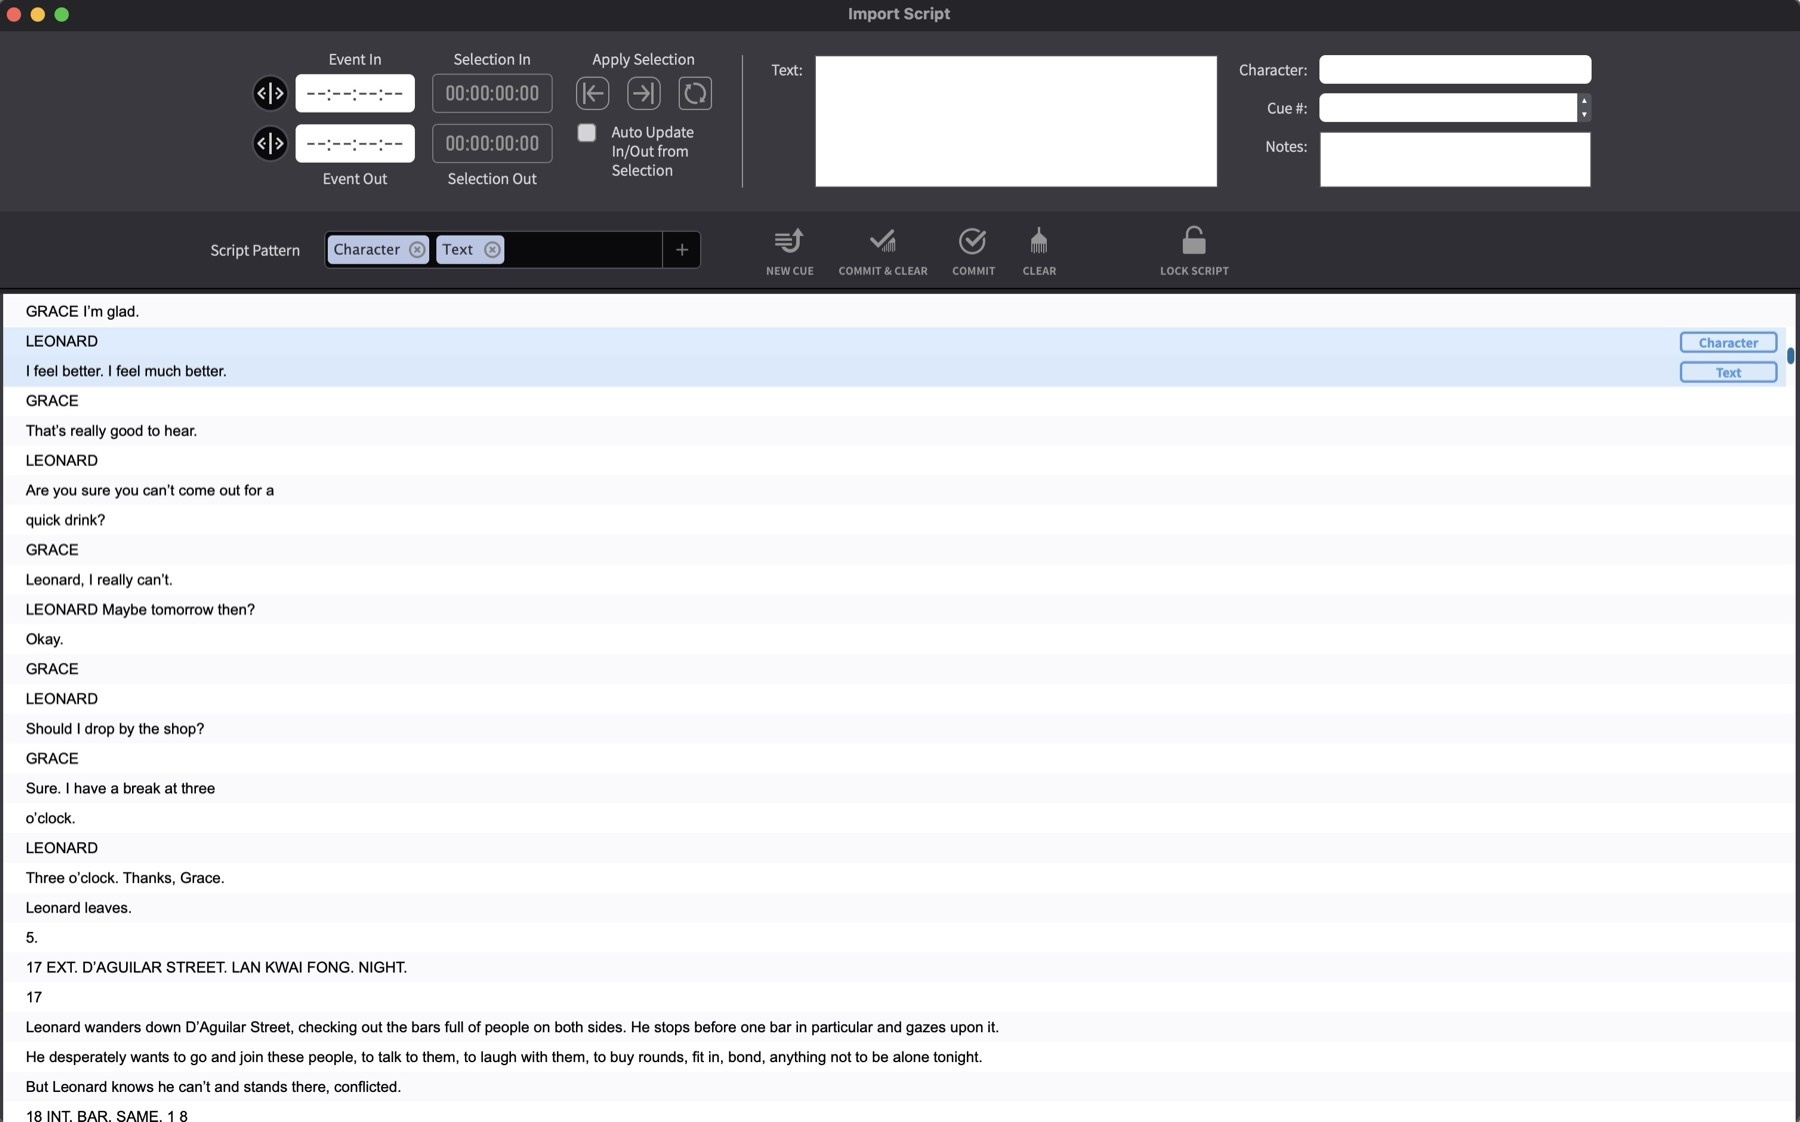
Setting the Script Pattern
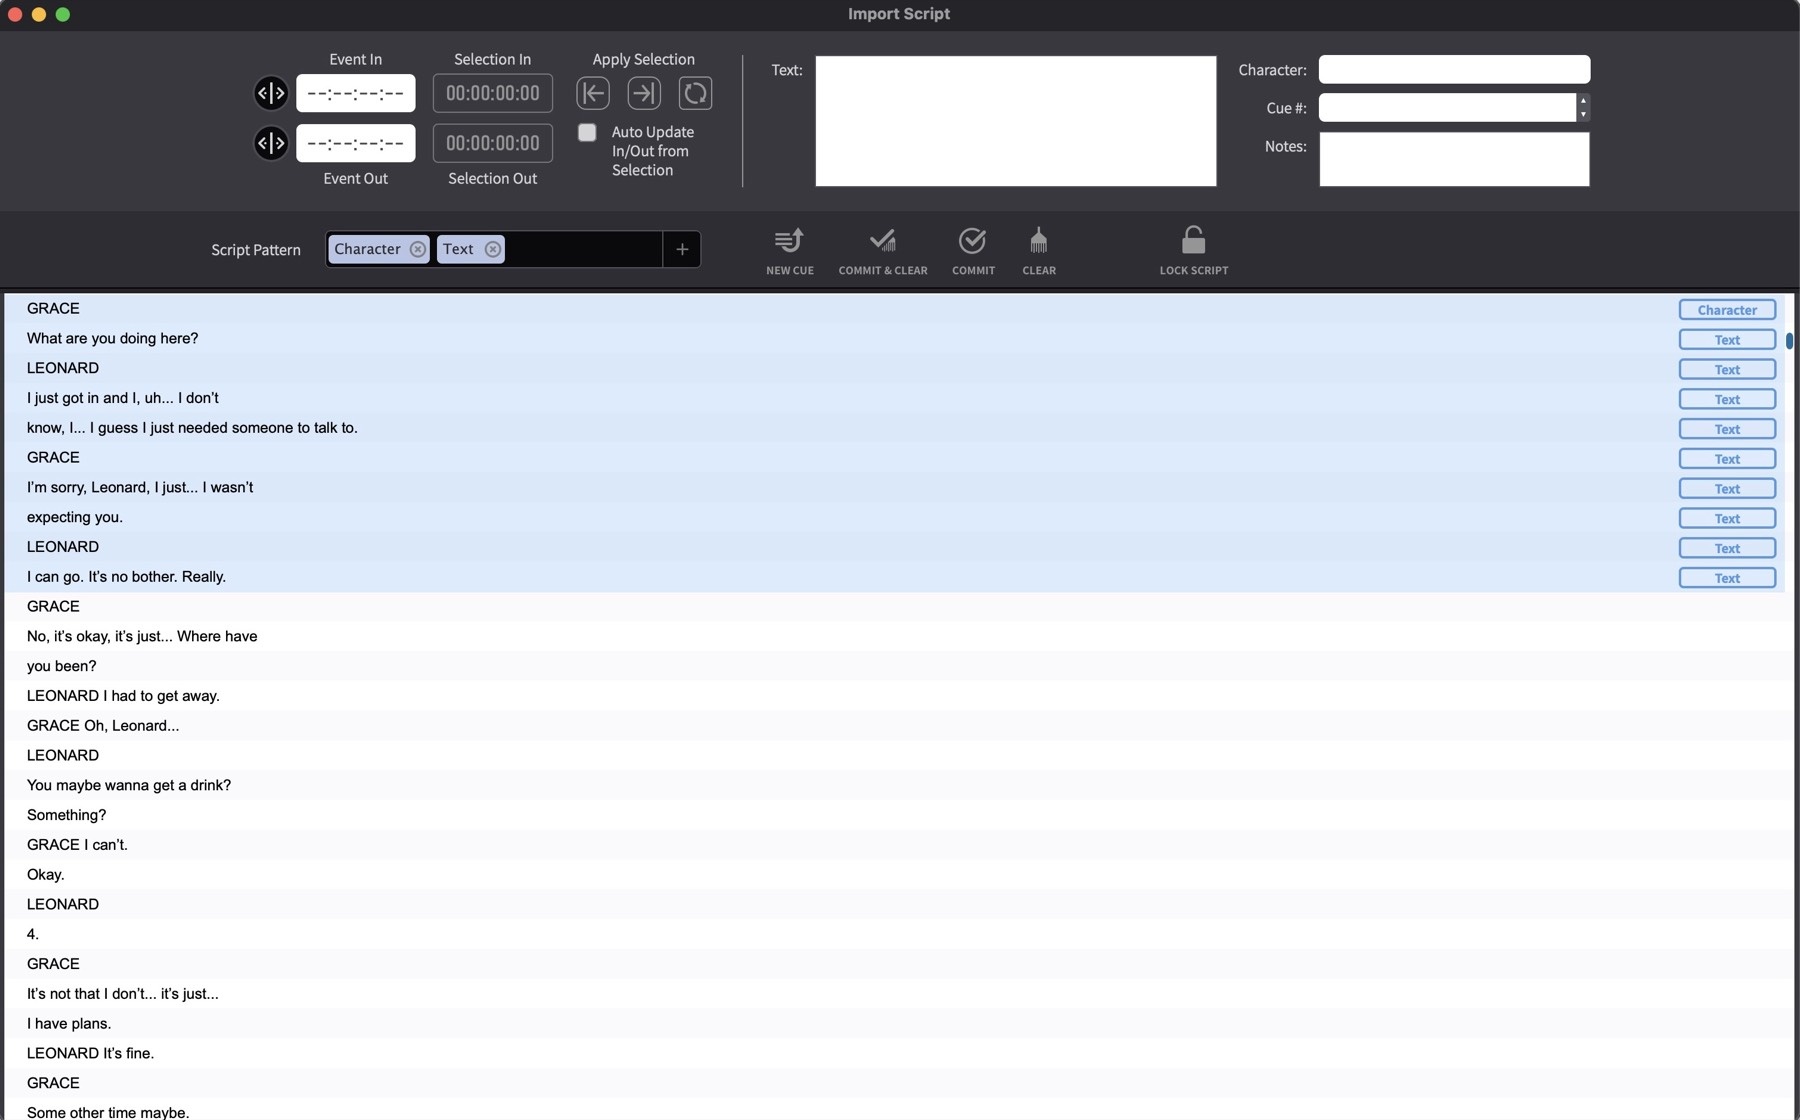
In the example shown above, the character name and text are the two most useful bits of information that can always be seen in a pattern that repeats itself throughout the script, with the character name first, then the line of dialogue.
To streamline the import from this shooting script, set the Script Pattern text field in the middle controller bar to Character & Text as shown in the example below.
 {width=60%}
Click the + button to add a new pattern element. Click the x button to remove an element. Drag the elements around within the field to change the order.
Highlighting the ADR line in the script
With this Script pattern set, holding the Option key & clicking on the character name preceding a desired line of text in the scirpt, will highlight both the character & the aformentioned text as well. Cue Pro will associate these lines with the relevant properties & their order according to the Script Pattern field.
Add the standard macOS Shift or Command key modifiers to click & add multiple consecutive or non-consecutive lines respectively to the selection.
Make sure that the Blue boxes to the far right of the window are corresponding the correct information of the highlighted selection.
 {width=85%}
Adding the selected information to the Cue fields
To add the selected information to the fields at the top of the window, click the first of the four buttons in the middle bar - New Cue from Script Selection, or use the shortcut Shift & N.
 {width=85%}
This does not yet add a new ADR Cue visual event to the Event List / Timeline.
Editing the Cue Fields
Once the script selection has been added to the cue fields, the information can be reviewed and edited before committing. Each field can be accessed directly using keyboard shortcuts: T for Text, C for Character, Q for Cue #, and N for Notes. These shortcuts place the cursor directly into the field, ready for typing.
The Text should always be double-checked against the lines delivered in the sync sound as there may be some differences that need correcting.
Cue Numbering and Nested Cues
The Cue # field can be incremented using the up and down arrows to the right of the field. This allows joining a cue to the previously imported cue - by clicking the down arrow once to match the previous cue's Cue #. This will create a "Schachteltake". The text for these nested cues will all be combined into one ADR cue in any exported ADR Cue sheets and treated as one cue in any ADR Summaries. But during the recording process, a Secondary Pre-Roll will be shown for each cue inside of the nested ADR Cue, and once the text of each passing cue has been shown onscreen, that text will be removed to show only the lines of the remaining cues.
Setting the Cue Timecodes
The Event In and Event Out timecode fields define the in and out points of the cue. When a DAW is connected, the current DAW selection is shown in the Selection In and Selection Out fields alongside the event timecodes. To apply the selection to the cue, use the three Apply Selection buttons: Set Event In Point from Selection (Option & Shift & I), Set Event Out Point from Selection (Option & Shift & O), and Update Event Timecode from Selection (Option & Command & U) which applies both at once. These are also available as system-wide shortcuts (Command & Option & F9, Command & Option & F10, and Command & Option & F8 respectively) - see the Keyboard Shortcuts chapter for the full list.
To have the event timecodes follow the DAW selection automatically, enable the Auto Update In/Out from Selection checkbox. With this enabled, any change to the selection in the DAW is immediately reflected in the Event In and Event Out fields. Even after the selection has been applied, the event timecodes can be updated independently - for example, by making a new selection in the DAW and using Set Event In Point from Selection or Set Event Out Point from Selection to update only the in or out point.
The event timecodes can also be entered manually by typing directly into either field, or adjusted using the nudge controls to the left of each field.
Committing the Cue
When all the information is correctly entered, click the Commit & Clear button in the middle bar, or use the shortcut Option & Space Bar. A new ADR Cue Visual Event is then added to the Event List / Timeline and the contents of all the fields are cleared.
After committing a cue, the playhead jumps to the in point of the newly created cue, and the cue is selected in the Event List. The imported lines in the script will show a light green background and a tick to the left of each imported line. The next recognised fields following the script pattern will be selected and entered into the cue field boxes above. If there are no new timecode values in the script, the last cue's out timecode value is applied as the next cue's Event In value.
In some instances - for example where multiple characters say the same line at the same point - it may be desirable to not have all the fields cleared after committing. To keep the information in the fields of the current cue for the next cue, use the Commit button instead of Commit & Clear.
Splitting Lines across multiple cues
For long lines which require breaking down into multiple cues for better timing reference, Hit T to enter the Text edit mode. Highlight the line wanted as the first cue. Use the keyboard combination Shift & Option & Space to commit the selected Text as the first cue. This is the only keyboard combination that works in Text edit mode - ie it is not possible to access the Commit button while in Text Edit mode.
After commiting the cue, the selected part of the text is deleted- leaving the remaining text. The rest of the field info is left the same. Postion the playhead at the start of the next line. Repeat this process until all lines are added.
Once done importing the long cues, use the Clear button to manually clear all the fields, ready for the next cue.
Continue adding all or as many lines - as and when required. The Import Shooting Script window can be kept open in the background of the Project, & be brought up whenever required for cue additions. The current script import progress & changes are kept intact while the window is kept open- even when re-opening a Project.